![]()
![]()
![]()
Windows NT Server is designed to be used as the cornerstone of enterprise-level networks. Other chapters have already discussed much of the functionality of NT that enables it to play this role so well. However, as strong as NT is, it is only as reliable as the hardware it runs on. Although the quality and reliability of today's PC hardware has greatly improved from 10 years ago, and will continue to improve in the future, the chance of something going wrong is always present.
Even if you are not using your system for mission-critical applications, it is important that your system be reliable, or the users will lose faith—and you might even lose your job. Never lose sight of the fact that most of the work you do is in support of the users. The network exists for the users, not for the sake of its own existence.
To help ensure that your system can be as reliable as possible, Windows NT includes a number of features that, when used properly, can help increase reliability and guarantee the integrity of your system. These features include the following:
The technology used for manufacturing computer hard disks has developed rapidly over the past few years. Today, most hard drives have a mean-time between failure (MTBF) of 180,000 hours, or more. The MTBF rating is meant to give you a statistical reference as to the likelihood that your hard drive will encounter an error that could cause data loss. Sometimes people see the 180,000 hours, do the math and come up with 28.3 years, which seems pretty good. If your hard drive only crashed once every 28.3 years, you’d probably be pretty happy. However, this is only a statistic, and it’s based on the drive running under fairly good conditions. If you have poor line power quality at your site, or your computer’s power supply feeds the internal components with less-than-clean power, this expected lifetime drops dramatically.
A fault-tolerant disk system is intended to provide mechanisms for reducing the likelihood of data loss in the event of a failure. Windows NT uses three different techniques for providing fault tolerance for the hard drive subsystems. These are Redundant Array of Inexpensive Disks (RAID), NTFS recoverability, and sector sparing. Each of these features is described in this chapter, both in terms of how they are implemented in Windows NT, as well as how you can take advantage of them.
RAID is a technology that has been around for a few years now and is traditionally implemented in hardware. The concept behind RAID is rather simple. Disk drives are typically one of the areas in high-performance computers that have the most bottlenecks. They just can't read data from the drive fast enough. This is one of the problems RAID was designed to help resolve. The idea is that by using multiple disks and spreading the data across them all in parallel, you can get a performance increase. In addition to providing increased performance, RAID has provisions for providing data redundancy, either though mirroring or the use of parity information.
TIP: RAID is another one of those great acronyms that people sometimes pronounce in unexpected ways. The most common method, and in my book the correct one, is like the roach spray, RAID, or to raid the refrigerator. However, you might run into the occasional pronunciation of "rad," as in radical. If you choose to use this pronunciation, don't be surprised when people keep saying "hunh?"
The key to RAID is a technique called striping. When the system tries to write a block of information to the array, the array controller (in this case, NT) breaks the information into smaller chucks of a predetermined size and writes these chunks in parallel across all drives in the array.
There are six basic levels of RAID, although other levels have been defined or suggested:
RAID 0 is useful for providing improved speed because the data is striped across all disks in the array. There is no need to calculate a checksum byte, so striping can offer improved performance over methods that use parity. Also, because you don't need a place to store the checksum byte, striping without parity requires less disk space—for each byte of physical data, you get one byte of logical data.
Windows NT includes software support for RAID levels 0, 1 and 5, which are the most common RAID implementations. Because RAID 0 does not provide any level of redundancy, it is not dealt with in detail in this chapter. For more information on disk striping, please see Chapter 6.
One of the major advantages of RAID on Windows NT Server is that it does not lock you into proprietary hardware interfaces, which can be a problem with most hardware solutions.
NOTE: If you want to find out more about the origins of RAID, a good starting place is "A Case for Redundant Arrays of Inexpensive Disks, or RAID," published by A. Patterson, Garth Gibson, and Randy Katz, University of California at Berkley, December 1987.
Windows NT Server includes a driver called FTDISK.SYS that provides fault-tolerant capabilities for NT Server. This driver actually performs many functions, but the primary purpose is to provide support for sector sparing and for RAID levels 1 and 5, also knows as disk mirroring and disk striping, respectively. This driver is included only in Windows NT Server, and therefore these fault-tolerant options are not supported on NT Workstation.
NT Server can use three primary methods to ensure the integrity of your disk data:
With traditional file systems such as FAT under DOS—and even HPFS on OS/2—the primary concern was with how fast the file systems performed, not necessarily with how reliable they were.
NTFS was built to provide the kind of data integrity assurances you need from an enterprise-level client/server system. When using FAT under DOS and Windows, if the system crashes, you end up with file system corruption. This corruption can lead to an entirely unusable system.
To prevent this problem, NTFS was created as a journal-based file system that records all disk transaction to a log before beginning. It includes in the log information necessary to roll back the transaction if needed. When the transaction is complete, NT marks it in the log. With NTFS, if the system crashes, all files that were currently being accessed are rolled back. This is done by consulting the log to find out what was going on and determine what actions were completed and what were not. The transactions that were not completed are rolled back to their previous state using information contained in the log. This transaction-based method of operating ensures that no matter what, the file system remains intact.
CAUTION: NTFS does not guarantee the protection of user data that was being updated during a system crash. It guarantees only the stability of the file system. This means that if the system crashed while a user was updating a database file, the data in that file might be corrupted as far as the database is concerned; however, the file system itself is intact. Sometimes this might not seem that important to some people, but the integrity of the file system is of paramount importance. If the file system itself becomes corrupt, you could lose all the data on a drive.
Sector sparing is the capability of a system to dynamically remap bad sectors as they are discovered during read or write operations. In Windows NT, sector sparing can occur at two different levels, either in the file system or with the fault tolerant driver, FTDISK.SYS.
Sector sparing in NTFS is discussed in greater detail in Chapter 6. Basically, if you are not using a fault-tolerant configuration and NTFS receives either a read or a write failure error, it marks the cluster as bad and remaps it to a good cluster—essentially destroying the information, but preserving the integrity of the file system. If the error is on a SCSI hard drive, NTFS tells the SCSI drive to remap the sector, and NTFS does not need to make any changes to the file system. If you are using an IDE, ESDI, or other drive that does not support cluster remapping, NTFS maps the cluster as bad at the file system level and reassigns it to a good, free cluster.
If you are using the fault-tolerant disk driver, FTDISK.SYS, NT can recover the data. Exactly how the remapping of the bad sector is done depends on your server's configuration.
If you are using a SCSI drive and it is part of a fault-tolerant array, FTDISK can recover the data. It doesn't matter which of the three NT files systems you use: FAT, HPFS, or NTFS. NT recovers the data either by using the mirrored copy (in RAID 1) or by reconstructing it from the other strips and parity information (RAID 5). FTDISK tells the SCSI drive to remap the bad sector, and FTDISK writes the salvaged information to the newly remapped sector. In this instance, the file system remains completely unaware of the problem.
If you are not using a SCSI drive, you must use NTFS to support sector sparing. Currently NT does not support file-system-level sector sparing on HPFS or FAT.
WARNING: If you are using a non-SCSI drive with FAT or HPFS and the disk encounters a bad sector, you will have file system corruption. Windows NT does not ship with any utilities that can help correct these problems.
If you are using a non-SCSI drive with NTFS and the system experiences a read or write failure, one of two things will happen:
TIP: If you want to provide maximum protection for data on your system, you should use only SCSI subsystems formatted with NTFS and configured in either a RAID 1 or RAID 5 configuration.
As discussed earlier, the FTDISK.SYS driver in Windows NT Server is used to support RAID levels 0, 1, and 5, as well as volume sets. Although RAID 0 and volume sets are not fault-tolerant systems, they still use NT's FTDISK.SYS driver. For more information on disk striping (RAID 0) and volume sets, please refer to Chapter 6.
One of the powerful features of RAID support in Windows NT Server is the capability to set up mirrors and stripes on a partition-by-partition basis, unlike hardware RAID solutions, where the minimum granularity is on the drive level, not the partition level.
NOTE: You can use the Performance Monitor to collect performance statistics for RAID subsystems in one of two ways. By default, if you enable disk performance monitoring, using the diskperf -Y option, the statistics that will be returned reflect the entire RAID subsystem. If you want statistics on individual drives in the RAID subsystem, you must use the diskperf -YE option to enable performance measuring for the physical drives.
Windows NT Server enables you to create mirrors of any partition, including the boot and system partitions. Additionally, mirroring works with any of NT's three supported file systems: FAT, HPFS, and NTFS. Mirroring works by creating a complete copy of the primary partition onto a mirror partition. You can use disk mirroring to mirror any of NT's supported hard drives, including SCSI and IDE-based systems.
In addition to gaining the benefit of complete data redundancy, disk mirroring can provide increased performance for your system. The FTDISK.SYS driver dispatches reads to both halves of the mirror, and the first response is used. A scenario where this would provide a performance boost is when the primary partition is busy performing a write, and a read request comes in. In this case the latent drive can respond faster, thus improving performance.
NOTE: Although in theory you could have more than two disks in a RAID 1 system, you would not realize any significant improvement in speed or reliability. For this reason, disk mirror sets are typically limited to two drives, as they are in NT Server.
Because NT Server's mirroring is done on the partition level, the two drives in a mirror do not have to be the same geometry. Nor do the partitions have to appear in the same part of each drive. For example, the primary partition might be the first 250MB of a 1GB drive, but the shadow partition could be the last 250MB of a 2GB drive. The FTDISK.SYS takes care of all the details to make sure this works fine.
NOTE: If you create a mirror set using two disks of different makes and models, the size of the mirror partition might differ from the primary partition by 1MB. This is due to NT compensating for the differences in drive geometry.
NOTE: Performance: If one of the partitions of a mirror fails, the FTDISK.SYS issues an alert, but the system appears to continue functioning normally. When one member of a mirror dies, even if it is the primary partition, there should be no noticeable performance degradation.
Of course, one of the primary advantages of being able to use drives of different makes and models is that it makes it much easier to replace failed drives. In some proprietary hardware-based RAID solutions, the disk geometry needs to be identical, so failure in a partition could pose a problem. NT's software-based RAID solution helps solve this problem.
In addition to disk mirroring, Windows NT Server also supports disk duplexing. Disk duplexing works by placing the two drives of the mirror on different controllers. The can potentially provide additional drive performance by dispatching commands simultaneously to both controllers.
Disk striping with parity in NT Server requires at least 3 disks and can support up to 32 disks. The stripes do not need to be on drives of identical geometry, but each partition must be exactly the same size.
WARNING: Although you can mirror NT Server's boot and system partitions, they cannot be members of striped disk sets—with or without parity.
Striping with parity gives you two basic features:
Although disk striping with parity can be useful, it does have its drawbacks. The major problem in some systems could be the overhead associated with calculating the parity information for writes. The more disks you have in the array, the more calculations are necessary to perform the XOR function used to calculate the parity. Although this overhead is still pretty small, your processor could become a limiting factor in the performance of the system—especially if it is already overburdened and if there are a large number of disks in the mirror.
An additional performance problem with disk striping with parity is that it is not very efficient for writing small blocks of data. If you primarily need a large number of small transactions, you might be better off using disk mirroring. However, disk striping with parity performs much better for large-block transfers, such as large graphics and audio files.
If one of the partitions in a striped set with parity fails, your system's performance is severely affected. Although everything continues working, FTDISK.SYS must use the information in the remaining stripes to regenerate the missing data on the fly. This means that reads from a striped set with parity where one of the partition has failed can take up to three times as long as normal.
The Disk Administrator is used to set up both mirrored and striped with parity disk sets on Windows NT Server.
CAUTION: When you create a mirrored partition, NT has to reboot before the configuration can take effect.
Follow these steps to set up a disk mirror in Windows NT:
NOTE: To create a disk mirror, you must be logged onto the server as a user with administrative permissions.
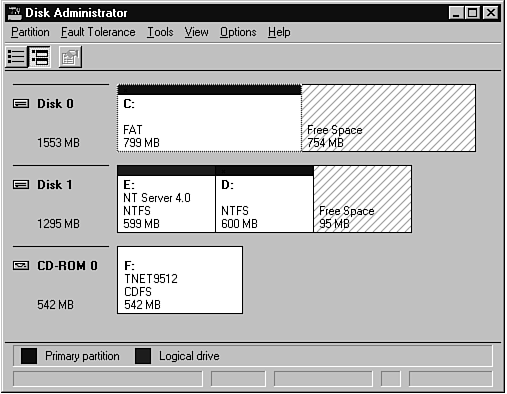
The Disk Administrator shows you the allocation of hard drives and CD-ROM drives in your system.
In our example, we are going to create a mirror for the 599 MB system partition (drive E) located on disk 1.
In our example we are going to click on the 754 MB free space at the end of disk 0 because this is where we want the mirror created.
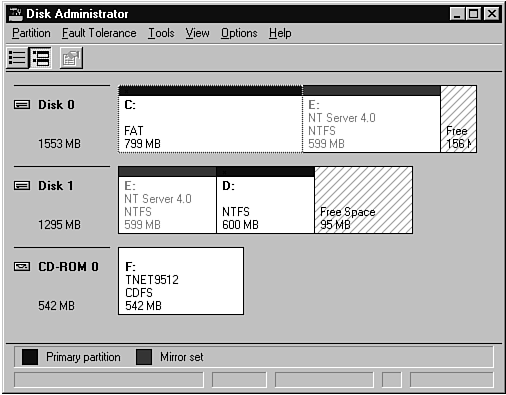
Figure 23.2 shows our 599 MB system partition on disk 1 mirrored on disk 0.
Disk Administrator is used to create a mirror of the 599MB system partition from drive 1 to drive 0.
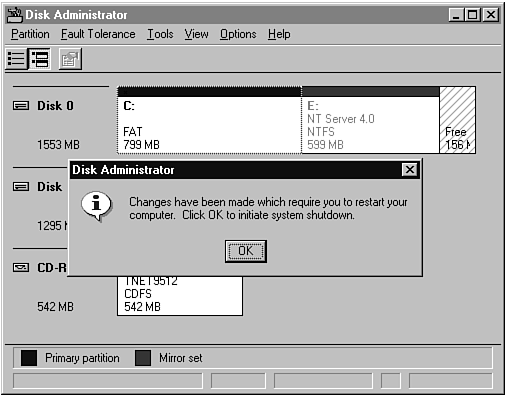
WARNING: When you make these changes, NT will require the system to restart when you exit Disk Administrator, as shown in figure 23.3. This is not like other operations where you are given the option of restarting or not.
Disk Administrator will force the system to restart when you create a mirror set.
For more information on the Disk Administrator, please refer to Chapter 6.
TIP: If you are creating a mirror of the system partition, then you should also create a fault-tolerant boot floppy, as described later in this chapter.
When you restart the computer, NT will begin to build the mirror, so you should see a flurry of disk activity. If you go back into Disk Administrator while the mirror is being created and click on the any part of the mirrored volume, The status at the bottom of the screen will display INITIALIZING. Once the mirroring process is completed, the status should display HEALTHY.
WARNING: Update your emergency repair disk by running RDISK.EXE. For more information about using RDISK.EXE, please refer to chapter 6. If you don’t update the emergency repair disk and you need to restore your system from backups, you will lose your mirror!
If you have created a mirror set for your system partition, you also need to create a fault-tolerant boot floppy. The purpose of the boot floppy is to enable the system to boot even if the drive that fails is the primary partition of the mirrored boot drive. Normally, the system begins to boot from the first primary partition installed by the BIOS. The NT bootstrap then begins loading NT from the ARC (Advanced RISC Computer) partition specified in the BOOT.INI file. The problem is that when the primary boot partition has failed, the partition referenced in the BOOT.INI file is invalid.
NOTE: Although the ARC convention for identifying system disk partitions was originally developed for RISC systems, Microsoft has adopted this naming scheme for Intel-based Windows NT systems as well.
The best method to solve this problem and allow your system to boot from the mirror of the system partition is to create a floppy disk with the NT bootstrap code that hands off boot control to a different ARC resource—the mirror copy.
To create a fault-tolerant boot floppy, use the following procedure:
NOTE: You must use NT to format this disk because the bootstrap code created by formatting it with DOS is unable to load the NTLDR.
XCOPY /H C:\NTLDR A:\
XCOPY /H C:\NTDETECT.COM A:\
XCOPY /H C:\BOOT.INI A:\
NOTE: If you have a system that boots from a SCSI controller that does not have its BIOS enabled you will also need to copy the NTBOOTDD.SYS file to your floppy disk. If this file does not exist on your hard disk, then you don’t need it on the boot floppy.
[boot loader]
timeout=30
default=scsi(0)disk(1)rdisk(0)partition(1)\WINNT
[operating systems]
scsi(0)disk(1)rdisk(0)partition(1)\WINNT="Windows NT Server Version 4.0"
NOTE: It is important to understand how to create the ARC naming path necessary for correctly identifying the proper partition. An ARC path takes the following form:
type(x)disk(y)rdisk(z)partition(a)path
type
Identifies the disk controller. If the disk controller is SCSI, the type is scsi. Other disk controllers, such as IDE and ESDI, are referred to as type multi. On some SCSI systems, you also use multi. x
The number of the adapter in the order it is loaded by Windows NT. For computers with only a single adapter, x is always 0. Note that all buses of a multi-bus adapter are referred to with the same value for x. For example an Adpatec 2742AT controller has two SCSI buses. They are both referred to with the same x value, since they are part of the same controller card. y
Calculated by multiplying the bus number (on multi-bus adapters) by 32 and adding the target ID of the drive. For controllers of type multi, y is always 0. Z
The device's logical unit number (LUN). For controllers of type multi, z is 0 for the master drive and 1 for the slave drive. For SCSI systems, this is always 0. a
The number of the partition on the disk. To figure out the partition number you want, remember this: MS-DOS extended partitions (type 5) are not counted, nor are unused partitions (type 0). Starting with 1, count the primary partitions first, then the logical drives. If there is only one partition on the drive, this value is always 1. path
The directory where you installed Windows NT Server, such as \WINNT, \WINDOWS, \WINNT40, or \WINNT35.
You should now test the floppy disk to make sure it does what you expect it to. Reboot the system and allow it to boot from the floppy disk.
WARNING: Remember that the only way for NT to catch a boot-sector virus is to start the system from a floppy disk. A boot-sector virus can totally destroy your installation of NT. For this reason, I highly encourage you to check the floppy disk for viruses before booting from it. After all, you are trying to protect your system from problems, not create new ones!
One of three things should happen:
What you see here is the NT bootstrap handed off correctly to the mirrored drive and NT coming to life. However, at a certain point during the boot process, NT realizes that it is running from the mirror partition of a mirror set. At this point, NT looks to see if the primary partition of the mirror set is accessible. If the partition is available and appears to be good—as is the case in this little test—NT dies with the blue screen you have just seen. This is done in an attempt to preserve the integrity of the mirror. However, if NT cannot detect the primary partition of the mirror set, it assumes that something is definitely wrong and continues to boot.
If you want to verify this for yourself, you can try unplugging the drive that contains the primary partition of the mirror and try booting from the floppy.
"Windows NT could not start because of the following boot configuration problem: Did not properly generate ARC name for HAL and system paths. Please check the Windows NT documentation about ARC configuration options and your hardware reference manuals for additional information. Boot Failed."
To try to solve this problem, you should review the instructions earlier in this chapter for determining the correct ARC path.
"Windows NT could not start because of a computer disk hardware configuration problem. Could not read from selected boot disk. Check boot path and disk hardware. Please check the Windows NT documentation about hardware configuration and your hardware disk configuration and your hardware reference manuals for additional information. Boot Failed."
To solve this problem, make sure the correct SCSI driver for your SCSI card is copied to the boot floppy. For additional help, you should contact the SCSI card's manufacturer.
There are two main reasons you might want to break a mirror set. First, you simply don't want the mirror any longer, or want to move the mirror to another drive. Second, one of the drives in the mirror has gone bad. In either case, the procedure for breaking the mirror is essentially identical. However, if you are breaking the mirror because one of the drives has failed, you should also refer the section later in this chapter on recovering failed mirror sets.
The procedure for breaking a mirror is as follows:
NOTE: In order to create a disk mirror, you must be logged on the server as a user with administrative permissions.
If you are breaking a mirror containing the system partition, you must reboot before the mirror can be broken.
When you break a mirror, NT does not delete any data. It simply breaks the mirror into two identical volumes. The primary part of the mirror retains the original drive letter, and the other half of the broken mirror gets the next available drive letter. If you want to recreate the mirror, you first need to delete the old mirror partition. You cannot simply rejoin the two broken halves together.
If you want to set up your system for disk striping with parity, follow these steps:
WARNING: When you create a striped set with parity, NT has to reboot before the configuration can take effect.
NOTE: In order to create a disk mirror, you must be logged on the server as a user with administrative permissions.
Enter the size you want and click OK.
The striped set with parity volume you just created is now available for use. For more information on the Disk Administrator, please refer to Chapter 6, File System Management.
WARNING: Update your emergency repair disk by running RDISK.EXE. For more information about using RDISK.EXE, please refer to Chapter 6. If you don't update the emergency repair disk and you have a problem with your system, you could lose data!
If one of the disks in a mirrored set or a striped set with parity fails, FTDISK.SYS logs an event to the system log. In both of these cases, the system continues to function as usual, as is the intent with fault-tolerant systems. However, exactly what effect this failed drive has on system performance and how to fix the problem depends on which fault-tolerant method you are using.
When one disk of a mirror fails, you will probably not notice a significant difference. This is yet another reason why you should make sure to periodically review your logs using the Event Viewer.
When one disk fails, FTDISK.SYS automatically adjusts itself to compensate for the problem. If the disk that fails is not the primary partition of your boot partition, the danger consists of only a single major problem. If the second drive fails, you will experience data loss. For this reason, you should endeavor to fix the mirror as soon as possible.
However, if the drive that fails is the primary drive of a mirrored set containing the boot partition, you have a potentially more serious problem on your hands. If this happens and you allow your system to reboot, then NT cannot load, because the boot information contained in the BOOT.INI file is pointing to the wrong location.
If you have determined that one of the drives of a mirror has failed, and the drive that failed is not the primary partition of a mirror set containing the system partition, use the following procedure to repair the problem:
If the primary partition of a mirror set containing the system partition has failed, you need to follow this procedure. For ease of understanding, I call the failed primary partition Disk 1 and the mirror Disk 2:
NOTE: Although it might seem senseless to keep rebooting the system and breaking and restoring the mirror, there really is a good reason.
Remember that a mirror set is really made up of a primary and a secondary partition. The primary is the real thing. In the preceding steps, the primary partition failed. The first thing you had to do was break the mirror. This left you with the primary partition as being bad, and the secondary partition as being good. You deleted the primary partition—or replaced the drive if necessary. Then you created a new mirror based on the information from the secondary partition. The problem is, it is now the primary partition. That's why you reboot the system and break the mirror again. You now have two good partitions, with perfectly good data. You have basically accomplished your job, which is to recover the primary system partition. This leaves you free to delete the partition that was the secondary partition of the original mirror—and that saved your life—and re-create the mirror, using the correct partition as the primary partition of the mirrored set.
Because the data in a striped set with parity is spread across all the drives in the array, you don't lose any data if a single drive in the array fails. However, your system does take a significant performance hit, because NT must re-create the lost data from the information and parity data spread across the remaining disks. Additionally, by having a single drive fail, you have lost the fault tolerance. If a second drive in the array fails, you lose all data on that volume. So, although NT can continue to function with a single drive failure, you should make every attempt to replace the failed drive as soon as possible.
Follow this procedure to recover from a disk failure in a striped set with parity:
When the computer restarts, it automatically begins to regenerate the data onto the newly added partition. This might take some time.
You can check the status of the regeneration by clicking the striped set with parity in Disk Administrator.
No matter how you implement fault-tolerant disk drives, there is always the possibility that data could get corrupted beyond repair, or even more common, that something could get accidentally deleted. Because there is no way to undelete files in Windows NT, it is very important that you maintain current backups of your system's data.
The damage caused by either failed hardware or accidental deletion ranges from minor nuisance to major catastrophe. To help protect your data, you should evaluate its importance and the impact data loss would have on your organization and then develop an appropriate backup plan.
In addition to deciding how often to back up your data, and what to back up, you should also consider making a policy on how user data gets restored. In most cases, if a system failure causes data loss, restoring the system is very high priority. But how do you deal with a user that comes and asks you to restore a file that he or she accidentally erased? It would be nice to be able to deal with this kind of situation immediately; however, in reality that's not always possible. That's why having a well-defined policy regarding restoring user data from tapes can be useful. It gives the user a statement of rights and provides the administrator the ability to prioritize.
Choosing a tape drive is at least as important as choosing the other components that go into making your system. If you are going to use the backup software that comes with NT, you need to make sure the tape drive you use is listed on NT's Hardware Compatibility List (HCL).
When choosing a tape backup device, here are a few things to look at:
TIP: One format that has recently been gaining wide-spread acceptance for its high transfer rates, long shelf life and high capacity, is the digital linear tape (DLT). DLT provides about three times the storage capacity of 8mm tapes (10 to 40 gigabytes depending on compression and type of DLT drive), not to mention three times the speed (between 2.5 and 3.0 megabytes per second sustained transfer with peaks up to 10.0 megabytes per second), and more than five times the expected life span (tape shelf life of 30 years, and drive head life of 10,000 hours).
One of the other advantages of the DLT format is the use of a multi-track, serpentine tape path. Multi-track means that in the case of DLT-2000 and DLT-4000 drives, data is stored on 128 parallel tracks (or 64 pairs of tracks) on the tape. The tape is read by moving forward along one track, and when the end of the tape is reached, it moves to the next track and reads backward. When the beginning of the tape is reached it moves to the next track and changes direction again. This is what is know as serpentine recording. It provides quick access to any point on the tape—significantly quicker than a single-track, longer tape.
DLT was originally popularized by Digital Equipment Corporation, but it is an open solution. With the growing need for large and fast tape backup solution, more major tape drive vendors are offering solutions based on DLT. If you need fast tape backup for large amounts of data, DLT might be right for you.
Every site is unique and this makes it difficult to provide a general formula for developing a backup strategy. However, here are a few things you should look at in determining your backup strategy:
This might sound like an obvious question, but you should determine exactly what you need to backup. More to the point, you should decide if you will only backup the server—or servers—or if you need to backup the client workstations as well.
TIP: As tempting as it might seem to maximize the use of large capacity local hard drives, in anything larger than a small network, this can dramatically increase the work of the information technology staff. By storing all user data on the network, the user’s workstation can be quickly replaced, or reloaded with a clean image when their is a problem. This dramatically cuts down on the diagnostic time required to isolate problem with a workstation.
In addition to determining what machines get backed up, you will have to decide what portion of the machines need to get backed up. For instance, if you keep a large clip-art gallery—or other static data source—loaded on the hard drive of one of your servers, you might not want to back it up. If you could simply reload it from CD-ROM, as necessary, the tape space it would consume, and the time it would take to regularly back it up might not be worthwhile.
Another great question with many different answers deals with where you should put the tape drive—or tape drives. Again, this depends on the setup of your network, how much money willing to spend, and what you want to accomplish.
The two main places for the tape drive would be in the server, or in a workstation.
NOTE: The backup program that comes with Windows NT does not support running the backup program on an NT Server and backing up the data to a remote tape drive. What you would do instead, is to mount the server at the client workstation and run a local backup program at the server, such as the backup programs that come with NT Workstation, or Windows 95. However if you do this, you will not be able to backup the Registry database on the NT Server
I always recommend having the tape device attached directly to the NT Server, because that ensures it will always be available when needed. If it’s attached to a client workstation, if the workstation is turned off, the backups will not get done. Also, having the tape backup device directly attached to the server makes it easier to recover the entire server if there is a system failure and you need to restore from tapes.
However, the advantage of placing the tape backup unit on the workstation is that if there is a problem with the tape drive, it can be corrected without disturbing the server. However, if the tape drive were directly attached to the server, the server would have to be shut down in order to rectify the problem.
The other consideration when using a client workstation to backup a server—or using a tape drive in a single server to backup multiple servers—is what effect it will have on network bandwidth. Remember, backing up multiple gigabytes over the network can have a negative impact on other applications running over the network. An if you do a verify on the backup, you actually end up copying the data over the network twice!
The foundation of a successful backup program is to implement a fixed schedule and keep up with it. Just like exercise programs, it doesn’t do much good to do it here and there. Set a schedule and stick to it!
As part of the schedule, you should rotate the tapes you use. If you only have a single backup set, you can’t go back to an older version if the tape set you are restoring from fails. Also, if you are in the middle of performing a backup, and the system crashes, how are you going to restore the system? If you have multiple backup sets, that will not be as much of a problem.
TIP: If you are backing up 1 gigabytes of data to an 8 gigabyte tape, don’t get lulled into using the same tape to do a full backup each night of the week. You should always use a rotational schedule.
Also, sometimes you might not become aware of a problem, such as a viral infection, until weeks, or months after it occurred. By keeping archived copies of your data, you can recover from these incidences better than if you always use the same tape set.
TIP: Tapes wear out. You should keep track of the number of times you use a tape, as well as the date of the first time you used it. You should retire tapes after they get too old, or have been used too many times. The exact life span of different tape types varies, and you should check with the manufacturer of the drive for recommendations. You might also check with the tape manufacturer, but they are often a little on the optimistic side because they want you to believe their products will last forever—or at least forever in computer years.
You will need to determine how often you want to run a backup by deciding how many days worth of data you can afford to lose. One common method of backing up is to perform a complete backup every Friday night, and then perform a differential backup each additional night of the week. The differential backup stores only the data that has changed since the full backup. Then, if you want to recover data, you would need the full backup tape, and one of the differential backup tapes. This is often good if your tape device cannot store all your server’s data on a single tape.
TIP: Always make sure you label your tapes. This prevents accidentally using the wrong tape. It will also speed up the recovery process, should you need to restore your system from tape.
Ideally you would supplement this strategy with a good rotational method that also includes off-site storage for added protection. For instance every two weeks, or once each month, you might retire a full-backup take and take this tape off site. Then in the event of a catastrophic accident, such as the building burns down, you will loose at most 2 to 4 weeks worth of changes. Of course the frequency with which you send tapes off site will increase depending on the value of your data.
CAUTION: NT does not encrypt data on the tapes when it does a backup, so be sure to put your tapes in a secure place, both onsite and off-site. Anyone who gets possession of that tape will have a complete copy of everything stored on your system.
The first thing you must do before you can use NT Backup is install a tape driver. NT Backup supports only backing up to and restoring from tapes, not floppy media or other hard drives.
To install a tape driver, use the following instructions:
NOTE: Make sure you are logged on as a user with administrative permissions before attempting to load a tape device driver.
If this does not work and you have a tape drive attached to your system, or if you have a diskette from the tape drive manufacturer that contains the necessary tape device driver, click the Drivers tab at the top of the window, then click the Add button. This brings you to a window where you can pick the tape driver you want to install.
NT Backup is a simple but elegant backup solution that serves the needs of most smaller LANs. You can use the NT Backup to perform selective backups and restores, for tape maintenance such as tape formatting and retentioning, and for backing up the local Registry.
Let's take a walk through a basic backup procedure.
First, be sure to have a tape ready. Some DC-2000 and DC-6000 cartridge formats require that you format your tapes before you can use them. Other tape formats, such as standard 4mm and 8mm tapes do not need to be formatted. A simple way to tell if your drive requires you to format tapes is to insert a tape, and from within Backup, look at the "Format Tape..." option under the "Operations" menu. If "Format Tape..." is grayed out, you can safely assume the tape does not need to be formatted.
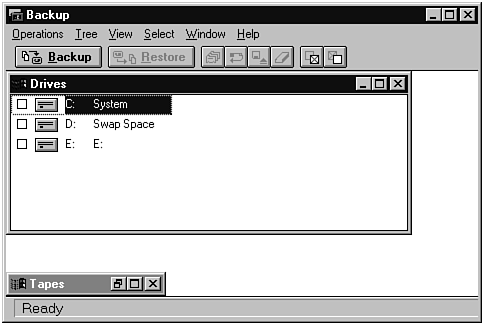
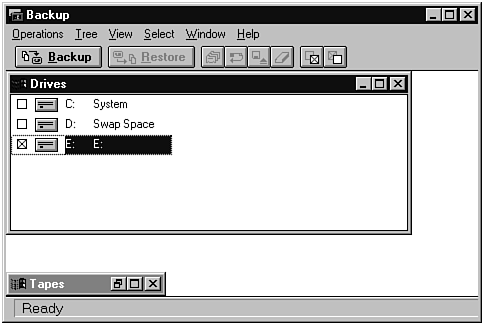
Notice the drive Window in the figure above. This window will show all local volumes, including CD-ROMs, as well as any current network connections. Placing a check mark in the box next to any volume, tells NT Backup that you want to backup the entire contents of that volume. Place a check mark next to any volume you want to backup.
The NT Backup utility is a full-featured tool for backing up and restoring data on your computer.
The check mark next to Drive E shows that it is selected for backup.
Once you have selected the drives you want to backup, click the "Backup" button.
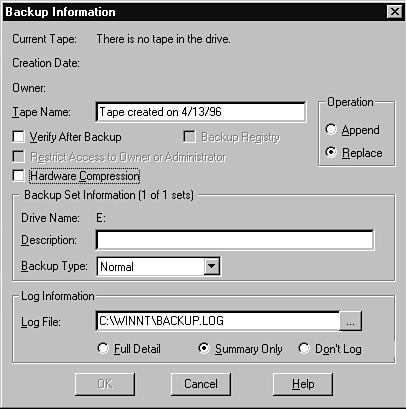
This window is used to configure the options for your backup. Here is an overview of the various features provided on this window:
The Backup Information window.
Full (Normal) Backup: All selected components are backed up and their archive bits are cleared.
Copy Backup: All selected components are backed up and their archive bits are not changed.
Incremental Backup: All selected components that have their archive bit set are backed up and their archive bits are then cleared.
Differential Backup: All selected components that have their archive bit set are backed up and their archive bits are not changed.
Daily Backup: All selected components that were modified today (regardless of the status of their archive bits) are backed up and their archive bits are not changed.
You can also set what kind of information the log records. By default, NT will record summary information only. The summary information consists of information such as the number of files backed up, the number of bytes backed up, the date and time the job started and when it finished, the elapsed time, the name of every directory that was backed up and a list of exceptions. If you choose the "Full Detail" option, NT will record the name of every file backed up. While to some people this might seem like a neat idea, don't forget that logs that contain full details grow very quickly. Of course if you don't want a log, then you should check the "Don't Log" option and no log file will be created.
Once you've finished configuring the backup options, click OK and NT will start the backup. A Backup Status window will appear showing the current progress of the backup.
If you wish to stop the backup at any time, click the Abort button and you will be prompted to confirm whether or not you really want to abort the backup.
If NT comes across any open files during backup, it will wait 30 seconds for the file to close. If the file does not close, then Backup skips over it and logs an exception to the backup log.
When NT is finished backing up all the files, the Backup Status window will remain on the screen. You can click OK to dismiss it and then you will be returned to the main Backup screen.
The Backup Status screen.
NOTE: NT Backup generates an audit entry to NT's Application Log when a backup set begins and when it completes. This means that if you back up two volumes, C and D for example, you will end up with four events logged in the Application Log.
To restore files created with the NT Backup program follow these steps:
NOTE: Make sure you're logged on as a user with permissions to access the tape you need to restore, as well having permissions to the destination, and the restore user right if you want to restore the files with their NTFS access control lists (ACLs) intact.
The tape backup unit resides on a client workstation.
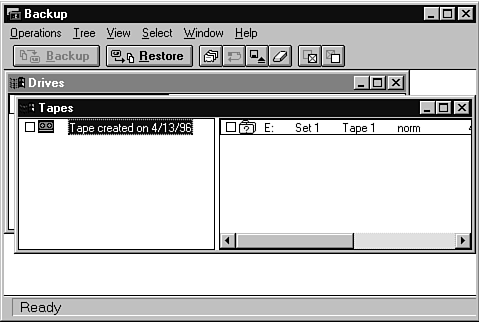
If you don't see a catalog of the current tape, choose the Catalog option from the Operations menu.
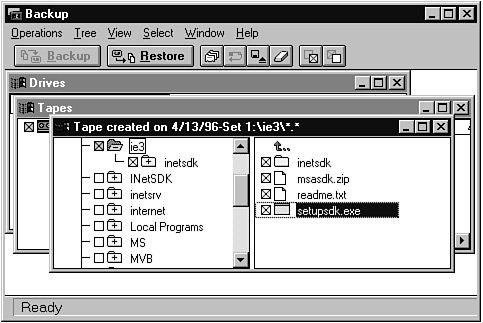
Once you have selected all the files you want to restore, click on the Restore button, or choose Restore from the Operations menu.
The Tape Devices Control Panel applet is used to install tape drivers.
If you are restoring more than one set, NT Backup displays the information for one set at a time and provides a scroll bar that can be used to view the restore information for the other sets.
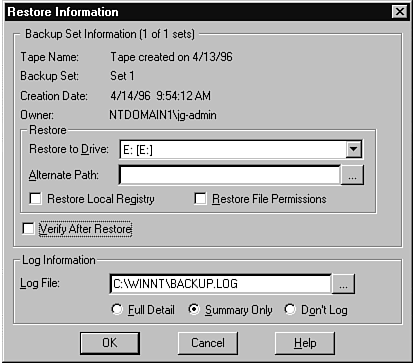
The Restore Information screen.
You are presented with the following information for each set being restored:
Tape Name: This is the name of the tape currently in the tape drive.
Backup Set: This is the ordinal number of the backup set on the tape. If you have backed up five volumes to the tape and restore files from the last set, the value for this field will be 5.
Creation Date: This is the date that the current backup set was created.
Owner: This is the name of the user account that created the backup tape.
Restore to Drive: Using this pick list you can specify any currently mounted, writeable volume to recover the files to. By default they will be recovered using the exact same directory structure from where they were backed up.
Alternate Path: If you don't want the restored files to use their original file structure, you can specify a path where Backup will create the restored files.
Verify After Restore: If you want to ensure that there were no problems restoring the data, you can have NT Backup verify the data. Selecting this option makes restoring files take roughly twice as long.
Restore Local File Permissions: You can select this option if you want files and directories restored with their NTFS permissions intact. You can only choose this option if the files were originally backed up from an NTFS partition and if you are restoring them to an NTFS partition.
Restore Local Registry: If you want to restore the system Registry, use this option. This option is only available if your are restoring from a backup of the system partition that was made with the Backup Local Registry option selected.
Additionally, you can specify the location of a restore log and the level of information that is recorded to the log.
The Restore Status screen.
NOTE: NT Backup generates an audit entry to NT's Application Log when a you begin to restore files from a backup tape and when the restore job is complete. If you restore files from more than one set, NT will generate an audit entry for the beginning and end of each set.
If you need to restore the entire server from tape because of a system failure, use the following procedures:
I have discussed how to use the GUI interface for NT Backup to perform backups and restores. However, in some instances you don't want to work with the GUI interface, so NT Backup provides a set of parameters that can be used to call NT Backup from the command line to perform different functions. The syntax for NTBACKUP is as follows:
NTBACKUP operation path [/a] [/v] [/r] [/d "text"] [/b] [/hc:{on|off}] [/t {option}] [/l "filename"] [/e] [/tape:{N}]
| operation | Specifies whether NTBACKUP should perform a backup or a restore. Accepted values are BACKUP or RESTORE. |
| path | Tells NTBACKUP which file or path should be backed up or restored. You can enter more than one entry here. |
| /a | Use this option to have the backup appended to the end of an existing tape. If you don't specify this option, NTBACKUP starts at the beginning of a tape and replaces any previously backed up data contained on the tape. |
| /v | Specifying this option has NT verify all data after performing the backup. Using this option takes much longer, and if used to back up data from a network share it effectively doubles the amount of network traffic. |
| /r | Tells NTBACKUP to mark this tape as a restricted access tape. Tapes marked as such can be read only by the owner and by members of the backup operators and administrators groups. |
| /d "text" | Supplying this uses the text in quotes as a description of the tape set. For instance, you might use this to mark your tape with an identifying number or with other information such as "Backup of FARINELLI workstation on 1/1/96." |
| /b | Including this option causes NTBACKUP to include a copy of the local registry on the tape. Note that this can be used only to back up the local registry. It cannot be used to back up the registry of a remote system. |
| /hc:{on|off} | Supplying the switch /hc:on tells NTBACKUP to use hardware compression, which on many systems effectively doubles the storage capacity. Using /hc:off causes NT to disable hardware compression. To use this option, your tape device must support hardware compression. This option is not effective when used with the /a option, because if you are appending your backup to a tape, NTBACKUP automatically uses whatever compression option was used for the first backup job on the tape. |
| /t {option} | Tells NTBACKUP whether to perform a Normal, Incremental, Differential Backup, Copy, or Daily Backup. Accepted values for option are NORMAL, INCREMENTAL, DIFFERENTIAL, COPY, and DAILY. |
| /l "filename" | Tells NTBACKUP to save a log file for the job in file "filename." By default, NTBACKUP uses a file called %SYSTEM_ROOT%\XXX. |
| /e | Supplying this option causes only exceptions to be written to the backup log. Without this option, NTBACKUP includes complete backup descriptions for the job. When backing up large numbers of files, the backup log can grow extremely large. Using this option can help keep the log to a more manageable size. |
| /tape:{N} | NT supports up to 10 tape drives. Use this option if you have more than one drive installed. Tape drives are designated as 0 to 9. By default, NT uses tape device 0. |
Although NT Backup does not have a built-in scheduling mechanism, you can use the scheduler service built into the NT system to run regular backup jobs automatically.
Before you can do this, you need to make sure the scheduler service has been started and the scheduler user has the appropriate user rights on the local system and on any system you need to back up.
Let's assume your system has two volumes: C and D. To perform a full backup of your system every Friday night at 10:00 pm and a differential backup of your system every Monday, Tuesday, Wednesday, and Thursday night at 10:00 pm, you need two scripts, as follows:
backfull.bat:
ntbackup backup c: d: /v /d "Full System Backup" /b /t normal /l "c:\users\backup\backfull.log" /e
backdiff.bat:
ntbackup backup c: d: /v /d "Differential System Backup" /b /t differential /l "c:\users\backup\backdiff.log" /e
Create a directory for these scripts. c:\users\backup might be a good location. Now you have two files: c:\users\backup\backfull.bat and c:\users\backup\backdiff.bat.
You then set up the jobs in the system scheduler by issuing the following two commands:
at 22:00 /interactive /every:friday "c:\user\backup\backfull.bat" at 22:00 /interactive /every:monday,tuesday,wednesday,thursday "c:\user\backup\backdiff.bat"
Now you're all set. Each morning you can simply take out the tape for the previous night and insert a new tape.
You can use the scheduler service and NTBACKUP to back up remote volumes, but you must take some additional steps.
By default, the scheduler user runs using the built-in SYSTEM account. When you run NTBACKUP from the scheduler service, it runs in whatever user context the scheduler service is using. The built-in SYSTEM account cannot make remote network attachments, so it cannot back up remote network shares.
If you want to back up remote network shares in this way, you need to run the scheduler service with a user context that has both backup and restore user rights and has permission to access files on the remote system.
Once you have the scheduler service running as a user with backup and restore user rights, and permissions to access the remote network shares you want to back up, you can create a batch file like the following to back up a share called CLIENTS from a machine called SAMSON:
net use k: \\SAMSON\CLIENTS net use k: /d
NOTE: Remember that if you tell NTBACKUP to verify data backed up from a network share, you double the amount of network traffic.
Assuming you save this batch file as c:\users\backup\samson.bat, you could have NT's scheduler service run this batch file every weeknight at 10:00 pm by issuing this command:
at 22:00 /interactive /every:monday,tuesday,wednesday,thursday,friday "c:\user\backup\samson.bat"
NOTE: If you include a /b switch in a backup command like the one contained in the batch file listed earlier, it backs up the registry on the computer that is running NTBACKUP, not the computer whose share it is you are backing up. Using NTBACKUP, there is currently no method to back up the registry on a remote machine.
Think of jumping out of the plane without a parachute. This is essentially what you are doing if you run your server without an uninterruptable power supply (UPS). This is one of the most important investments you can make to protect your server. I would consider it a crime comparable to treason to set up a server of any kind without providing an UPS device for protection against power problems.
TIP: There are two ways to pronounce UPS. If you have noticed that I write "an UPS," you probably realize that I pronounce it "ups" as a word. This is the most common way. You can also find people pronouncing the letters individually, "U-P-S."
Now that you realize how important they are, I will explain why. An UPS is a device that is plugged in between your computer and the wall and provides protection for your computer in the event of a power failure. Most UPSs also provide line conditioning to ensure the quality of power that actually reaches the computer. This translates into longer life for your computer's power supply, and for all of your computer's components. Also, since most servers rely heavily on disk caching—such as Windows NT’s lazy write file system—you risk loosing all data stored in a write cache.
NOTE: If you are using NTFS under Windows NT and the power goes out, you will not get file system corruption, however, you will loose the contents of the lazy write cache that has not bee committed to disk.
In most cases an UPS is not intended to enable you to continue working through a lengthy power outage. Rather, it is intended to permit your server to shutdown gracefully without loosing data.
NOTE: Of course, in some mission-critical situations your system must be able to outlast long power outages, but the cost of UPS devices to support this kind of operation can be costly.
TIP: Buy an UPS for each of your servers. Now that you have that settled, let's talk about the rest of your network. Realize that if there is a major power failure, an UPS protects the machine attached to it, but what about the rest of your network? What about the routers? What about the hubs? Sometimes people put UPSs on their workstations and servers and think they are protected from catastrophe. Boom, the power goes out and they lose their network connections because their hubs are gone. These devices are important too! Just remember to ask yourself what you need. Do you just need to make sure that your sever can shut down safely, or do you also want to make sure that your users do not lose data because their workstation die, too? If the later is your goal, you need to put UPSs on their workstations, but also on all the network components.
One of the questions you need to answer is what you want to protect with your UPS—what is the goal for which you are installing the UPS. There are so many mitigating circumstances that it is almost impossible to list them all, but here are a few things to look at:
As with any other component of your server system, you should give careful attention to buying an UPS. Of course, price is always going to be a factor, but here are some other things to think about:
TIP: One of the most difficult tasks about buying an UPS is determining how large it should be. There is no simple rule that determines 100% accuracy, but for a conservative guess, you should add up the rated power consumption for all devices you will plug into the UPS. The rated power consumption on all electrical components is given in watts. Most UPSs are traditionally rated in volt-amps (VA), which measures the UPSs output capacity. The relationship between the two is determined by a power factor, which varies depending on the make and model of the UPS. However, a good rule of thumb would be that a 1000VA UPS can support a maximum load capacity of 600 to 700 watts. At the maximum load capacity the UPS will provide the least amount of runtime. The smaller the load capacity, the longer the runtime.
Unfortunately there is no simple shoppers method that you can use across all UPS vendors for quick comparison. In order to determine your systems runtime at different load levels, you will often need to contact the UPS vendor for help.
On-line UPSs are the original type of UPS device, sometimes called a double-conversion UPS. With an on-line UPS, the computer is always feeding from the battery, so the battery is constantly charging. When the power fails, the UPS continues feeding the attached device, with no interruption or switching. These are also the most expensive type of UPS, and according to some people, unnecessary.
Stand-by UPSs are very common, particularly in the newer low-cost UPSs targeted for the home consumer market. Stand-by UPSs work by constantly monitoring the quality of the incoming AC power and when it detects a dip in voltage, the UPS provides power to the attached equipment.
NOTE: Remember a battery provides a type of electricity called Direct Current (DC), while the type of power you get from the electrical outlets is Alternating Current (AC). The UPS is in essence a large battery and it needs to convert the DC power provided by the battery into AC power, which the computer’s power supply expects to get. This process is called inversion and the UPS provides this through a built-in inverter.
The amount of time the UPS takes between the beginning of the voltage dip and when it begins providing power to the attached equipment is called the transfer time, and it varies depending on the make and model of the UPS, but is often between 2 and 10 milliseconds. The power supplies in most computer hardware are rated to be able to keep the system going for a minimum of 10 to 15 milliseconds after the loss of power. This is called the hold-up time for the power supply. In actual tests, though, most systems are not even affected by power losses of 50 to 100 milliseconds, or greater. However, you want to be sure to get an UPS with a low transfer time.
Line-interactive UPSs provide the functionality of stand-by UPSs, but they also provide enhanced line conditioning. They use voltage regulation methods to try to correct over and undervoltages without changing over to the battery. This is usually listed as brownout protection and can help to increase the life of the UPS.
NOTE: Before installing any software that comes with your UPS, you should ensure that it is designed for your version of NT, including any service packs you might have installed. I have had problems with this in the past. When in doubt, contact the vendor before installing the software.
More than nine months after NT 3.5 had been shipping, I installed an intelligent UPS from a major UPS manufacturer—not names mentioned—along with their software, which was designed for NT. Nowhere in the instructions did it even mention which version of NT it had been designed for. After spending hours cleaning up its mess and subsequently contacting the UPS vendor to complain, I found out that the version I had been sent was only for NT 3.1.
Although NT has built-in support for intelligent UPS devices, some makes and models of UPS devices actually come with their own software, which usually provides more robust services than the built-in UPS service. If your UPS comes with its own software for NT, you should probably use it, just contact the vendor to make sure it supports Windows NT 4.0.
However, if your UPS does not come with its own software, you can use the UPS service built into NT. The UPS applet can be configured to work with most of the intelligent UPS devices on the market.
TIP: Before buying an UPS, you should be sure to consult the latest NT Hardware Compatibility List (HCL).
To install the UPS, you should follow the manufacturer's installation instructions for attaching the UPS to a serial port on your Windows NT system. Once the connection is established, use the following procedure for configuring the UPS service.
To configure the UPS service, you must be logged on as a member of the administrators group. To do this, follow these steps:
NOTE: To configure the UPS service, you must be logged on as a member of the administrators group.
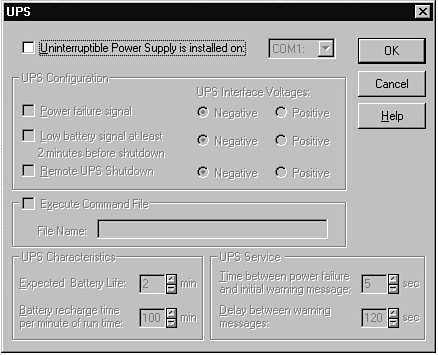
The UPS window.
Power failure signal: You should check this box if your UPS is capable of sending a signal to NT when it detects a power failure. You must also select whether your UPS sends a positive or negative voltage for this signal. This information can be found in the documentation for your particular UPS.
Low battery signal at least 2 minutes before shutdown: Check this box if your UPS is capable of sending a signal to NT when it detects a low battery. Again, you should set the positive or negative value according to the documentation for your UPS.
Remote UPS Shutdown: You should check this box if your UPS is able to respond to a signal to shut itself off. For example, if your UPS has a network interface and could receive a command from network management software to shut down, you would use this option. You must also select whether your UPS sends a positive or negative voltage for this signal. This information can be found in the documentation for your particular UPS.
Expected Battery Life: Some UPS devices have a built-in load indicator that gives you a good indication of how long the system should continue running with the current system load. If you use this value for setting the expected battery life, you should make sure that all devices needed for the system, such as the monitor, are turned on when taking this reading. However, if your UPS does not have a method of indicating the current load, you should be sure to use the charts included in most UPS manuals to determine how long the battery should last. To do this properly, you need to know the power requirements for each device plugged into the UPS. The default for this value is set to a conservative 2 minutes, although you should definitely make sure to use the proper value discovered earlier. The UPS applet accepts settings between 2 and 720 minutes.
Battery recharge time per minute of run time: This value is the number of minutes your UPS must recharge for each minute it provided power backup for your system. Properly filling in this value enables NT to keep track of the recharge state of the UPS so that if there are multiple short power outages, it can properly calculate the current battery level. You need to consult your UPS manual for this setting, and it depends on the amount of power drawn by the system connected to the UPS. The default for this setting is 100. This means that if the UPS was needed for two minutes, it would take 200 minutes (over three hours) to completely recharge. This setting can be set to between 1 and 250 minutes.
Time between power failure and initial warning message: When the standard line power fails and NT must switch over to the UPS to supply power, NT sends an administrative alert. The value you specify here determines how long NT waits after the power fails before it sends the first administrative alert. You want to choose a value here that makes sense. For instance, you want to ensure that this value is low enough that NT has time to send the administrative alert before the power actually fails. It is best practice to keep this number fairly low. In general, the default value of 5 seconds is good for most environments. If you want to change it, values between 0 and 120 seconds are accepted.
Delay between warning messages: Once NT has sent its first message warning you that the UPS has kicked in, it continues to send warnings on a regular basis. The amount of time between warnings is set by this option. The default is 120 seconds and can be changed to anything from 5 seconds to 300 seconds. The default setting of 120 seconds is probably about right for most environments. There is no way to prevent these follow-up warning messages. If you don't want these alerts, the only thing you can do is set this value to its maximum, which is 5 minutes.
You should definitely test your UPS on a regular basis. The simplest way to test an UPS is to unplug the UPS from the wall. You might not want to try this the first time with your live NT system. Some UPS devices do not actually switch to battery unless there is a load applied, so you should make sure to have something plugged into it—a monitor is good for testing. Or you can simply tell your NT system to shutdown and when it tells you it is safe to shut off the computer, pull the UPS’s plug from the wall.
CAUTION: If you are like most people, you probably got you new UPS and want to play with it right away. You should always make sure to allow your UPS time to fully charge (usually overnight) before using it.
Failure to allow your UPS to fully charge before using it could prevent it from properly protecting you, because NT assumes that it is fully charged and makes its calculations based on this assumption.
Once you are confident that the UPS actually does what it is supposed to, you can turn your attention to how NT responds:
Although you don't need to test all these features all the time, you should regularly test your UPS to make sure that everything is functioning properly. Most UPS models include a test button that is equivalent to momentarily unplugging the UPS.
When you install Windows NT, by default, no entries are created for the UPS service in the Windows NT Registry. However, the first time you run and configure the UPS applet in the Control Panel, NT creates an UPS subkey, which can be accessed through the following path: HKEY_LOCAL_MACHINE\SYSTEM\CurrentControlSet\Services\UPS.
For the UPS service to function properly, this subkey must exist and contain valid entries. If you uninstall the UPS service, this Registry subkey is not automatically removed.
Seven values can be set in this subkey that affect the functioning of the UPS service (see Table 23.1). All of these values can be set using the UPS applet.
Table 23.1. Table caption.
| Value Name | Value Type | Permissible Value | Default Value | Description |
|---|---|---|---|---|
| BatteryLife | REG_DWORD | 2-720 minutes | 2 | The length of time the UPS battery should last during a power failure. |
| CommandFile | REG_EXPAND_SZ | a filename | none | When the UPS service must shut down your NT system, this is the command or batch file it runs before doing so. |
| FirstMessageDelay | REG_DWORD | 0-120 seconds | 5 | During a power failure, Windows NT waits this number of seconds before sending a broadcast to notify the users. |
| MessageInterval | REG_DWORD | 5-300 seconds | 120 | After sending the first broadcast message to users that the system is running from battery backup, NT repeatedly sends broadcast warnings every few seconds. The time between broadcasts is set by this value. |
| Options | REG_DWORD | value mask | none | [need to research this more.] |
| Port | REG_SZ | COM port name | COM1 | The COM port that Windows NT expects to find the UPS attached to. |
| RechargeRate | REG_SZ | 1-250 minutes | 100 | Specifies how many minutes it takes to fully recharge the UPS. |
Windows NT was designed to provide the level of fault tolerance necessary for supporting large, mission-critical applications and server solutions. This chapter discussed three major fault tolerance systems provided by Windows NT: disk fault tolerance, server backup, and support for uninterruptible power supplies (UPS).
You got to see how Windows NT that provides fault tolerance for disks, including how it can work with the drive controller on a SCSI disk to perform sector sparing, the fault tolerance, including fault-tolerant disk support, such as sector sparing, as well as some of the recoverability features of NTFS, including support for sector sparing on non-SCSI disks. You also learned a little about FTDISK, the Windows NT driver that is used to support disk fault tolerance, including RAID. You had the opportunity to learn about the different levels of RAID, find out which are supported by NT, and what situations each is good for.
The chapter continued with a discussion about backing up Windows NT. You got some advice on what to look for in choosing a tape backup device for your sever, as well as how to use NT’s built-in tape backup program for backing up your server.
Finally, you learn about uninterruptible power supplies and what to look at when purchasing one for your NT Server. You also got to see how to configure the built-in UPS support for Windows NT and how it can be used to monitor power events to ensure the integrity of the data on your server.
![]()
![]()
![]()
![]()